Sunday, November 13, 2011

Mycetic Spore Tutorial

  This is the story of how I made a Mycetic Spore.  I know there are about a million Mycetic Spore articles out there, but I thought I'd contribute mine because I'm really happy with how it turned out, and it was dirt cheap and dead simple to make.
  The materials you will need to make this are
    1) One 6"ish styrofoam egg from your local craft store.
    2) One block of Sculpey or Sculpey equivalent.
    3) Some plasticard
    4) One of those little Squamous Bits from Battle for MaCragge or the Genestealer kit (not absolutely necessary, but I think it is a nice touch.)
    5) Mat Gel Base (apparently this is made by Vallejo, it's a gel substance meant to be mixed with paint to give texture or with collagey stuff)
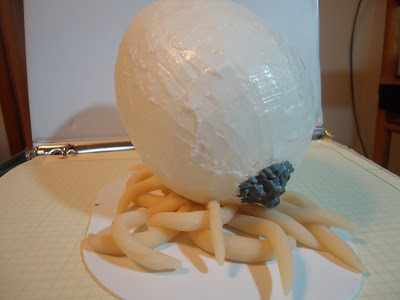
  The first thing you'll need to do is cover your styrofoam egg with Mat Gel Base.  The purpose of this is to tone down the styrofoam texture and to protect the foam from the primer.  This will probably take a couple coats which can be scraped on with a butterknife or similar implement  Each coat will take a while to dry, so let it (otherwise it'll get all fingerprinty).
  After the Gel Base is on and dry, let's make the tentacles.  To make the tentacles, you'll need to roll out tentacle shapes from Sculpey.  My 'pile-o-tentacles' used exactly one block of Sculpey.  Make a ring from Sculpey large enough to set the egg on and attach the tentacles to said ring, then flop the tentacles all over eachother in a big old tentacley mess.  Squish the egg into the center of the pile of tentacles so that after the Sculpey gets baked the egg will fit nicely.  Remove the egg and bake the tentacles as per the directions on the Sculpey.
  Once the Sculpey has been baked, you can glue the Squamous Bit to the egg and the egg to the tentacles. Then cut out a base from plasticard, glue the tentacles to the plasticard, and you're done!
  I painted the egg like I would the shell on my bugs, and the tentacles like flesh.  The end result is about the size of a drop pod, large enough to hide a Carnifex behind, and looks pretty good (if I do say so myself). Mine of course looks something like an eldritch coconut, but that's just the way things go.
  If anybody asks you to justify this design, I like to tell them that it's an egg full of biomass and instructions for assembling a unit, it births out gaunts or zoanthropes or whatever through it's little Squamous Bit.


Saturday, November 12, 2011

Lash Whip and Bone Swords 2

So I'm mostly finished with my Tyranid Prime.  I've still got to base him and do the final Bleached Bone highlights on the shell bits on the arms (swords, etc.).  Also, the deathspitter isn't ready at all yet.  But here are some pics of him!  I'm still not sure how to highlight the bone-swords, but I'm sure I'll figure something out.


And yes, those are totally ancient orks in the background.

Saturday, November 5, 2011

How to Lash whip and Bone sword

  Disclaimer: This post is about bone swords, so practically everything I say is something she could have said (that's what she said!), please bear with me.


A blast from the past!
  So after playing a few games using an old Broodlord model as a Tyranid Prime, I decided scything talons and rending claws were just not cutting it.  So I decided it was time to make an actual prime and to make it have some bone swords (3+ armour was just ruining my prime's effectiveness).  So first I'm gonna tell you how I made my bone swords and lash whip (I'm making all the arms magnetic so as to have more options).


  First thing I did was draw a to scale sketch (by tracing a spinefist onto an index card) of what I wanted my bone sword to look like.  Then I cut the sketch out and used it as a template for cutting two bone swords out of plasticard.
  After I had cut out my bone swords, I whittled down the hard edges (but cutting along the edge very lightly at a 45 degree angle to the flat surfaces), and I used a file to sharpen the 'blades' of the swords.
  The arms are spinefists.  I cut off the front of the fist (everything past where the dangly tubes meet the hand) and glued an armour plate from the gaunt kit to the front.  Finally, I cut a groove into the top of the fist and fitted my bone sword into the groove.  Then you're done!  Now for the lash whip.

  So here's the lash whip, I've since done some green stuff work on it, but the principle is very much the same as for the bone sword.  I've got the same arm setup (so it matches) and I've glued a green stuff whip shape to it instead of a bone sword.  I recommend rolling out the lash whip on your work bench or whatever and letting it dry, then fitting it onto the arm.


  So the other thing I've done worth talking about here is that I've magnetized all of these arms so I can have basically every option worth bothering with.  In doing so, I've discovered some stuff about magnetizing limbs that I will pass on.
Posing on the model was very important for the deathspitter
As you can see, this guy's arm is at a funny angle

  I started of course by drilling out sockets on the body for each of my magnets.  Once I'd glued the magnets in (CHECK POLARITY BEFORE GLUING!!) I stuck a magnet to each of the freshly magnetized sockets.   I feel like the posing of the arms for this guy worked out way better than it has in the past (a Carnifex and a Warjack).  The reason is that I cut out a big chunk of the shoulder of each arm, then glued it in the pose I wanted to the magnet stuck to the torso.  This occasionally results in your arm being glued to the torso or the magnets becoming glued together, don't worry too much about this, just let it dry and then cut it apart with your hobby knife once it's all set.  After gluing the arms to the magnets, I pulled them off and green stuffed new shoulders on.  With some armies I'm sure this would be more difficult, but it's kind of a breeze with Tyranids.

On to part 2!
A Hello to Arms