Showing posts with label Modelling. Show all posts

Thursday, July 4, 2019

Throwback Thursday: inq28

I've lately been really inspired by all of the great blanchitsu, inq28, and aos28 stuff I see online.  I love making bizarre conversions, and am trying to broaden my horizons with regard to painting styles, so it's fun to see what other people are doing.  However, I'm actually no newcomer to inq28.  I bought the Inquisitor rulebook when it came out (I was a high school freshman) and played a fair bit of it with my brother.  I also had the Daemon Hunters and Witch Hunters army books and was inspired by the conversions sections in the back of them.

Anyhow, I dug out some of my old warband models and got photos of them!  They're not great, I was like... 16, but it's kind of fun to see what i was up to all the way back then.

This first picture is of Inquisitor Heep (a play on Uriah Jacobus), a weird servitor thing I made, a Necromunda ganger, and a zealot.


Wednesday, January 30, 2019

Archduke Marrow-Gnawer’s Royal Guard

Another day, another Shadespire warband.  I've actually done all of the season 1 warbands except for Ironskull's Boyz now!  (I haven't bought them yet, but I have plans to convert them into a Nurgle warband)  This time I've transformed the Skaven warband into Flesh-eater Courts.


Friday, January 4, 2019

Bar-Zhagg’s Grot Slaves

The dawi zharr Daemonsmith Bar-Zhagg has been on a slave capturing mission in the Painted Spires of Efengie.  He and his enforcer Druzgul have managed to collect 5 grot slaves and 2 squigs to accompany them on their quest in the damned city of Shadespire.

Thursday, October 18, 2018

The Flames of Penitence

Having recently acquired Nightvault, I've got a new warband up and running!  I've made a Dark Age of Sigmar inspired conversion of Averon's Cursebreakers.


Thursday, September 27, 2018

The White Scarstriders

Continuing on with my series of ridiculous conversions for Shadespire warbands, here is Veteran Sergeant Sanson Farstrider and his White Scars battle brothers.  They have answered Sigmar's call for aid, been issued Mk. S power armour, and are now on the hunt in the dead city of Shadespire.

Wednesday, July 4, 2018

Maggoth Lords

I recently picked up a Maggoth Lord kit and being the cheapskate that I am decided to build all three!  I magnetized the torsos so that they can be hotswapped.  What's more, not being content to just have swappable bodies, I also made two magnetized sets of legs for them to stand on when they're not riding a Maggoth.


Tuesday, June 26, 2018

Gor-rek's Reavers

I've finished a third Shadespire warband!  I'm still figuring out what wacky conversion to do with my Sepulchral Guard, but for the moment, here is my Khorngor warband (otherwise known as Bloodreavers).

Monday, April 2, 2018

The Chosen Axes... of Hashut!

I got the Chosen Axes Shadespire warband for my birthday.  I've viewed Shadespire warbands as an opportunity to do some wacky conversions on a small scale such that they do not have to be followed up with a full army's worth of the same.  So far, it's been very rewarding and fun with my Bretonnian themed take on Steelheart's Champions, and now a Chaos Dwarf version of the Chosen Axes.


Tuesday, November 14, 2017

The Bloat

His brothers in arms simply call him "The Bloat". He used to have a name, but nobody uses it now that he's dead, his belly swollen with rot and Nurglings. Some suspect that he's actually just a meatbag full of the vile little creatures and that when he 'dies' again, they'll come pouring out. Whatever it is that keeps him walking, it's rendered him formidable enough that nobody has yet been able to test that theory.

Saturday, October 28, 2017

The Tzaanitaur

Sadly, I missed Ex Profundis' 'The Eclipse' modelling/painting competition back in the spring, but I decided to do something for the Monster Competition.  After an extensive rooting through of my bitz and bobz, I settled upon building a Tzaanitaur to go with my Tzaangors.  Enjoy!


Monday, November 28, 2016

Magnetizing a Terrorgheist

I recently bought "King Vlagorescu's Ghoulish Host" and just finished my Terrorgheist the other day.  I don't have WIP pictures, but I thought I'd share a bit about magnetizing it for convenient transportation.  For starters, I gave very serious consideration to magnetizing it so that it could convert between a Terrorgheist and Zombie Dragon.  In the end, I decided that this was pretty infeasible.  There is a nice tutorial on how to do it at this blog, but after looking at the pieces in person, I decided that it was not for me.

Saturday, May 21, 2016

Deathrattle Heroes

After getting the new Flesh-Eaters Battletome, I've had to resort to working on my Deathrattles so that I don't spend too much money.  Since I played Vampire Counts before the End Times, I've got plenty of stuff lying around.  So I've rebased and/or kitbashed a collection of characters to get the old skellingtons up and running.


I've rebased a Liche Priest and Tomb King I made toward the end of 8th ed. who never even saw battle :( and made a brand new Necrotect.  Also, I went ahead and rebased Krell Wight King with Black Axe.  The Tomb Kings heroes are all made out of bits I got from a friend.  They were leftover skeletons from the Necrosphinx howdah and the backs of the Necrosnakes (I forget what they were actually called).  I just creatively appropriated bits and hacked them together to make the heroes.  You may notice that the Necrotect's dagger is actually just a speartip, so that should give you an idea.

 Also, I want to shout out to the Empire Flagellants kit.  The scroll and skull bit that I used on the Liche Priest is amazing for taking any model and making it an instant wizard.

Monday, April 18, 2016

Chaos Dwarf Deathshrieker Rocket WIP

Here's what I've been working on instead of writing more 40k warscrolls (I'll get back to it soon enough, I'm working on Tau now).  I recently picked up a Helstorm Rocket Battery and a Dwarf Cannon as conversion fodder for my Deathshrieker Rocket Battery and Dreadquake Mortar.  I finished building the crew yesterday and thought I'd share.


I ended up having two of them hold rockets because of the dearth of good looking crew arms in the Dwarf Cannon box (seriously).  I also forewent resculpting any of the beards.  I decided it was a better expenditure of effort to give them brutal looking facial coverings.  To that end, I did uncover a few neat techniques for doing this.

First (and most generally applicable) is that an easy way to make rivets is to dice up little tiny pieces of semi dried greenstuff and glue them in place.  I say semi dried because (while unintentional) I found that I could still shape them a little after they were glued in place.  I used this to massage the rivets into slightly rounder shapes.  This resulted in pretty tiny rivets though, which was exactly what I wanted.  I'll post again once I've painted them so you can see how the technique turned out.


Second, I wanted to mimic the scale mail facial armour from one of the Hellcannon crew.  It's a little hard to see in this picture, but I actually chopped up plasticard into small rectangles and glued them down to create scale armour hanging out to cover the bottom half of this guy's face.  It's hard to see because I used clear plasticard since it was the thinnest I had.


I don't have anything interesting to share about the third crewman.  I just free-sculpted a skull mask onto him.  It's not the greatest thing in the world, but I think it'll do once it's painted.

Sunday, November 13, 2011

Mycetic Spore Tutorial

  This is the story of how I made a Mycetic Spore.  I know there are about a million Mycetic Spore articles out there, but I thought I'd contribute mine because I'm really happy with how it turned out, and it was dirt cheap and dead simple to make.
  The materials you will need to make this are
    1) One 6"ish styrofoam egg from your local craft store.
    2) One block of Sculpey or Sculpey equivalent.
    3) Some plasticard
    4) One of those little Squamous Bits from Battle for MaCragge or the Genestealer kit (not absolutely necessary, but I think it is a nice touch.)
    5) Mat Gel Base (apparently this is made by Vallejo, it's a gel substance meant to be mixed with paint to give texture or with collagey stuff)
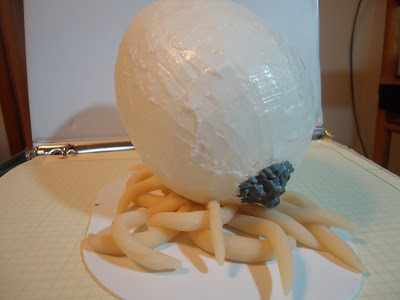
  The first thing you'll need to do is cover your styrofoam egg with Mat Gel Base.  The purpose of this is to tone down the styrofoam texture and to protect the foam from the primer.  This will probably take a couple coats which can be scraped on with a butterknife or similar implement  Each coat will take a while to dry, so let it (otherwise it'll get all fingerprinty).
  After the Gel Base is on and dry, let's make the tentacles.  To make the tentacles, you'll need to roll out tentacle shapes from Sculpey.  My 'pile-o-tentacles' used exactly one block of Sculpey.  Make a ring from Sculpey large enough to set the egg on and attach the tentacles to said ring, then flop the tentacles all over eachother in a big old tentacley mess.  Squish the egg into the center of the pile of tentacles so that after the Sculpey gets baked the egg will fit nicely.  Remove the egg and bake the tentacles as per the directions on the Sculpey.
  Once the Sculpey has been baked, you can glue the Squamous Bit to the egg and the egg to the tentacles. Then cut out a base from plasticard, glue the tentacles to the plasticard, and you're done!
  I painted the egg like I would the shell on my bugs, and the tentacles like flesh.  The end result is about the size of a drop pod, large enough to hide a Carnifex behind, and looks pretty good (if I do say so myself). Mine of course looks something like an eldritch coconut, but that's just the way things go.
  If anybody asks you to justify this design, I like to tell them that it's an egg full of biomass and instructions for assembling a unit, it births out gaunts or zoanthropes or whatever through it's little Squamous Bit.


Saturday, November 5, 2011

How to Lash whip and Bone sword

  Disclaimer: This post is about bone swords, so practically everything I say is something she could have said (that's what she said!), please bear with me.


A blast from the past!
  So after playing a few games using an old Broodlord model as a Tyranid Prime, I decided scything talons and rending claws were just not cutting it.  So I decided it was time to make an actual prime and to make it have some bone swords (3+ armour was just ruining my prime's effectiveness).  So first I'm gonna tell you how I made my bone swords and lash whip (I'm making all the arms magnetic so as to have more options).


  First thing I did was draw a to scale sketch (by tracing a spinefist onto an index card) of what I wanted my bone sword to look like.  Then I cut the sketch out and used it as a template for cutting two bone swords out of plasticard.
  After I had cut out my bone swords, I whittled down the hard edges (but cutting along the edge very lightly at a 45 degree angle to the flat surfaces), and I used a file to sharpen the 'blades' of the swords.
  The arms are spinefists.  I cut off the front of the fist (everything past where the dangly tubes meet the hand) and glued an armour plate from the gaunt kit to the front.  Finally, I cut a groove into the top of the fist and fitted my bone sword into the groove.  Then you're done!  Now for the lash whip.

  So here's the lash whip, I've since done some green stuff work on it, but the principle is very much the same as for the bone sword.  I've got the same arm setup (so it matches) and I've glued a green stuff whip shape to it instead of a bone sword.  I recommend rolling out the lash whip on your work bench or whatever and letting it dry, then fitting it onto the arm.


  So the other thing I've done worth talking about here is that I've magnetized all of these arms so I can have basically every option worth bothering with.  In doing so, I've discovered some stuff about magnetizing limbs that I will pass on.
Posing on the model was very important for the deathspitter
As you can see, this guy's arm is at a funny angle

  I started of course by drilling out sockets on the body for each of my magnets.  Once I'd glued the magnets in (CHECK POLARITY BEFORE GLUING!!) I stuck a magnet to each of the freshly magnetized sockets.   I feel like the posing of the arms for this guy worked out way better than it has in the past (a Carnifex and a Warjack).  The reason is that I cut out a big chunk of the shoulder of each arm, then glued it in the pose I wanted to the magnet stuck to the torso.  This occasionally results in your arm being glued to the torso or the magnets becoming glued together, don't worry too much about this, just let it dry and then cut it apart with your hobby knife once it's all set.  After gluing the arms to the magnets, I pulled them off and green stuffed new shoulders on.  With some armies I'm sure this would be more difficult, but it's kind of a breeze with Tyranids.

On to part 2!
A Hello to Arms

Sunday, October 30, 2011

I told you I'd tell you how I made a deff rolla

Unfortunately I didn't get any 'before' pics of the deff rolla because my wife had her camera (the nerve). But here's a pic of it finished and attached.
And I'll explain how that was made. You can use any cylinder of the appropriate size (I used two empty citade wash pots glued together). I wrapped some plasticard (in my case harvested from a hard card protector) around the cylinder after scoring and folding it so it would have those hard corners. The spikes are made by cutting a chunk of empty sprue into a squat pyramid. I cut a ton of said pyramids, glued them onto the rolla, and then glued a bit of sand around each one. The mounting for the rolla was made by cutting some more plasticard into the appropriate shape. I also glued some ancient rhino hatches on the sides to give it some depth. Overall, pretty easy.
I used a lot of plasticard in making this piece, but I'm too poor to afford plasticard at the moment and I improvised a lot. Here's a list of places from which to harvest plasticard:

Used gift cards/membership cards/credit card offers
Hard card protectors
Empty milk cartons
Medicine containers
Over-packaged toys

Also, cardboard will work for a lot of the same things as plasticard. The core of my battlewagon is thin corrugated cardboard. Here's some more pics of my mostly finished battlewagon cuz that's how I roll.

Sunday, October 23, 2011

Battlewagon

So I got busy with school and forgot to post last week, but here's what I've been working on lately.
So what I've done here is take the current Ork Battlewagon kit and place it on top of a land raider chassis. The Land Raider had already been modified by its previous owner (and was in pretty bad condition, the spots where you can see plastic on the land raider are mostly covered in glue or carved up pretty badly... but it was free, so). The Land Raider chassis is not actually wide enough to house a Battlewagon, so I ripped the treads apart from the hull and made a new hull by cutting out a rectangle of cardboard to the correct width to support the battlewagon and wrapping it around the places where the hull would have been.
To cover the areas that were sick with glue or carved up, I spread some superglue thinly across the afflicted areas and then stuck some sand to them (as you'll see later).
You can see where that streak of superglue was dribbled down the side, now it's grime and grit!
Ah, and since I'm here anyways, I thought I'd talk about the new weathering pattern I tried on this tank. What I did was use an old frayed paintbrush to apply chaos black in a ragged pattern along the worn edges of the vehicle, and then used to same to a lesser extent to put on boltgun metal and or mithril silver.
I also want to show off my magnetized big shootas (so I can change the weaponry later if need be) but my wife apparently has her camera today, so I'll do that next week. Also, I'll show at some point how I'm making the deff-rolla for this thing.